Proxmox and CloudInit
October 1, 2025
I wanted to build a few VMs for my k8s cluster - a master node which would hold the k8s control plane, and a few worker nodes.
I didn’t fancy building 4 VMs for my k8s cluster by manually installing the O/S (Ubuntu 24.04) from the ISO and going through the installation GUI when faster and more reliable methods were available. Enter CloudInit.
Deploying templates to VMs using CloudInit starts with the creation of the VM template. While this can be done via the Proxmox UI, I chose to use the command-line as much as possible.
To create the template, there are a number of internet resources you can follow. I based myself on Techno Tim’s Perfect Proxmox Template with Cloud Image and Cloud Init video though there are a number of very similar videos and blogs. While the video is around 3 years old, I found it a good base. Note that Tim also publishes a companion blog with the details of the commands etc. However, I find that these resources don’t provide enough context or explanations for the commands they use. As part of my intention in these articles is to educate/explain, this article is somewhat longer and more wordy than the other resources you may read.
At the end of this article, I have compiled some resources that have been useful to me and may be to you.
All the commands below were run as the root user on Proxmox (or “pve” for Proxmox Virtual Environment).
The key steps are:
- Download the cloud image
- Create the new Virtual machine
- Import then attach the downloaded CloudInit image to the VM
- Add a CloudInit drive to the VM and make it bootable
- Add a serial console to the VM
- Convert the VM to a template
- Configure CloudInit (the parameters, that is)
- Clone the template into a new VM
- Update the CloudInit configuration in the VM to meet your needs
- (Optional) Grow the disk
Download the CloudInit image
A Cloud Init disk image is similar to an ISO file and is the boot/installation disk for our VM. Canonical’s repository of Cloud Init images is here. You will need to download the image that suits you needs. For me that was: https://cloud-images.ubuntu.com/noble/current/noble-server-cloudimg-amd64.img. Once you’ve found the image you want in the repository of cloud images, right-click the file and select ‘Copy link address’ so that you can paste it into your download command.
To perform the download, use the following command (replacing the URL with your choice of CloudInit image, the one you ‘copied’ in the previous paragraph) while logged into your Proxmox server as root. The file will be downloaded in the current directory. You may wish to download it to /var/lib/vz/template/iso (the iso directory of the ’local’ storage in Proxmox). In a later step the downloaded image will be imported into the storage of your choice alongside the VM definition.
wget https://cloud-images.ubuntu.com/noble/current/noble-server-cloudimg-amd64.img
Create the new VM (to later be converted to a template)
In this process, we first create a VM and later, when we want to use it, we clone it. It’s best practice to convert the VM into a “template” which protects you from accidentally starting it, etc. Thus it is the template that we will (later) clone into the actual VM we want.
Pick the values you need for memory, CPU, etc., making sure that the VM ID is unique. I prefer to use what I think of as minimum usable values. For my purposes, my k3s control pane node needs 4GiB RAM and 4 vCPU, and the worker nodes will be using the same values, though as their load increases, the RAM and vCPU will probably need to be adjusted.
qm create 8200 --memory 4096 --core 4 --name ubuntu-cloud --net0 virtio,bridge=vmbr0
This creates a VM with ID 8200, sets the core count to 4, gives it the name “ubuntu-cloud” and sets the first network interface to use the virtio driver and the vmbr0 ‘bridge’.
Import then attach the downloaded CloudInit image to the VM
For it to be used by the VM, the cloudinit image must be imported to the VM and placed in a proxmox storage. Think of this as converting the downloaded ‘img’ file into a qcow2 file, Proxmox’s preferred format. On my server, that storage that will hold the resulting qcow2 file is called “data4tb”.
The commands are below - The bolded text needs to be adapted for your environment.
“noble-server-cloudimg-amd64.img” is the file name from the wget command which will be imported into the Proxmox VM as ‘vm-8200-disk-0’… It’s disk number 0 of VM id 8200.
The cloudinit disk images are just big enough. This means that once it’s up and running you won’t have enough disk space to store very much. In my testing I failed to install more than 2 or 3 packages as the VM ran out of space. To alleviate this issue, the commands include growing the disk. Doing it at this stage has the benefit that at first start, the filesystem will expand to fill the disk. The ‘resize’ command tells pve to grow the disk so if it was 3Gbytes to start with the command below will give you a disk of 53Gb.
The last command sets the boot order to contain just one disk, the one attached to scsi0.
qm disk import 8200 noble-server-cloudimg-amd64.img **data4tb**
qm set 8200 --scsihw virtio-scsi-pci --scsi0 **data4tb**:vm-8200-disk-0
qm resize 8200 scsi0 +50G
qm create --boot order=scsi0
Add a Cloudinit ‘drive’ to the VM
The cloudinit drive (usually an ISO file - pve will (re-)generate it for you) contains the parameters for the cloudinit operation that will take place when the VM boots.
The parameters/values can be set in the Proxmox GUI and this is done later in this process:
Note that the first command will create the cloud-init disk - though it’s actually an ISO file rather than a generic disk. It will output the progress of the creation of the disk.
qm set 8200 --ide2 **data4tb**:cloudinit
Add a serial console to the VM and enable Guest Agent
This step is needed to enable you to view boot output, etc. via Proxmox’s Console function (VNC - a virtual remote/screen).
If you you don’t plan on adding some SSH keys, this step is vital. Without it, in the absence of SSH keys, you won’t be able to log in even from the pve console.
By default, pve does not try to talk to the guest agent on VMs. I recommend switching that on as it gives visibility in the GUI to the VM’s networking which is very useful, especially when the network was set up for DHCP.
qm set 8200 --serial0 socket --vga serial0
qm set 8200 --agent enabled=1
Convert the VM to a template
While you can clone a VM, it’s best practice to create a template (as mentioned above) which you configure as needed and to then clone the template to a VM when you need a VM.
qm template 8200
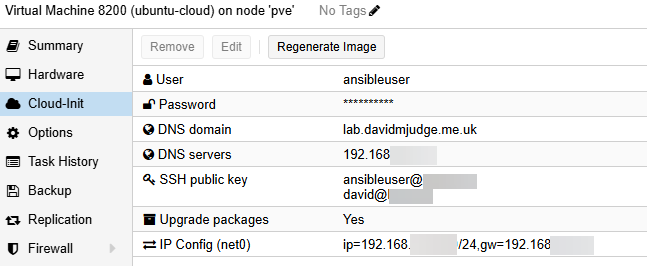
Configure CloudInit (the parameters, that is)
In Cloudinit images, the cloudinit process which is executed on every start of a cloudinit VM takes its configuration from the configuration data stored in the cloudinit disk we created earlier. This section explains how to populate that disk with the custom configuration we need.
You can manually configure the cloudinit parameters using the GUI as mentioned earlier. However the intent of this article is to document the steps you will need to create the VMs using just the command line so that, in time, we can automate the process via a script or an automation tool.
Certain aspects of cloudinit can be configured individually on the command-line. e.g. you can set the ssh key to the contents of a file thus: qm set 8200 --sshkey ~/.ssh.id_rsa.pub which will set the cloudinit SSH key to the contents of the id_rsa.pub (the public key) from the .ssh directory of the user’s home directory.
I need to be able to ssh into the VMs from multiple different places: my ‘home’ computer, the Proxmox server’s CLI and from my Ansible server and for this I need set the cloudinit SSH Key to contain all three keys.
The easiest way to do this is to update the ‘user’ section of cloudinit which includes configuration of the user, their password, and other parameters including the various ssh keys that will be needed. Note that you only deploy the public keys! And it’s best practice not to set a password for the user which, in effect, enforces the more secure use of SSH keys to log in remotely.
To do this, we need to create a yaml configuration file. For my example, the yaml file will look like this:
#cloud-config
hostname: ubuntu-cloud
manage_etc_hosts: true
fqdn: ubuntu-cloud.lab.davidmjudge.me.uk
user: ansibleuser
# You can add a password here, but that's not generally considered a best
# practice as it's better to ssh in using keys.
# If you want to be able to log in via Proxmox's console, you need to set a password.
ssh_authorized_keys:
  - ssh-ed25519 AAAAC3NzaC1lZDI1NTE5AAAAIKL1EWv5ZwWTti7qoZbA+OZDGE5U+JhUU1Mxb+M0ZxkL ansibleuser@ansible4
  - ssh-ed25519 AAAAC3NzaC1lZDI1NTE5AAAAIAP9eyxA4P8mE51qmbnigiuEmX72dRFRuN4SLmp0ISuA david@Ryzen2
chpasswd:
  expire: False
users:
  - default
package_upgrade: true
Note that the keys in the above configurations are public keys, so dn’t need to be hidden or obfuscated.
The user-data configuration can be used for much more - later in this article you will see how I configured it to install the package qemu-guest-agent and start it - see the ‘packages:’ and ‘runcmd:’ sections of the user configuration a little further down.
Configuring cloudinit custom configuration files
Cloudinit allows you to use configuration files that are read by cloudinit at startup. While there are 4 different areas or sections in cloudinit (user, network and meta, vendor), I will only need to customise 2 of them: user and network.
You can then use the yaml files for user and network to configure these aspect of cloudinit.
These configuration files must reside on a PVE filesystem configured to contain snippets. The next few paragraphs cover the creation of a directory in the pve GUI to hold the snippets.
One thing to note is that once you are using cicustom files, changes via the GUI to the cloudinit configuration will have no effect ad the contents of the configurations will take precedence.
Creating a snippets directory
The cloudinit configuration yaml files must be stored in a location that can be reached when the VM is starting - i.e. in a pve storage location. To be able to create a snippet, you will first need to add a “snippet” storage if you haven’t got one. To do this, in the Proxmox GUI, select your storage view and add a ‘directory’ storage:
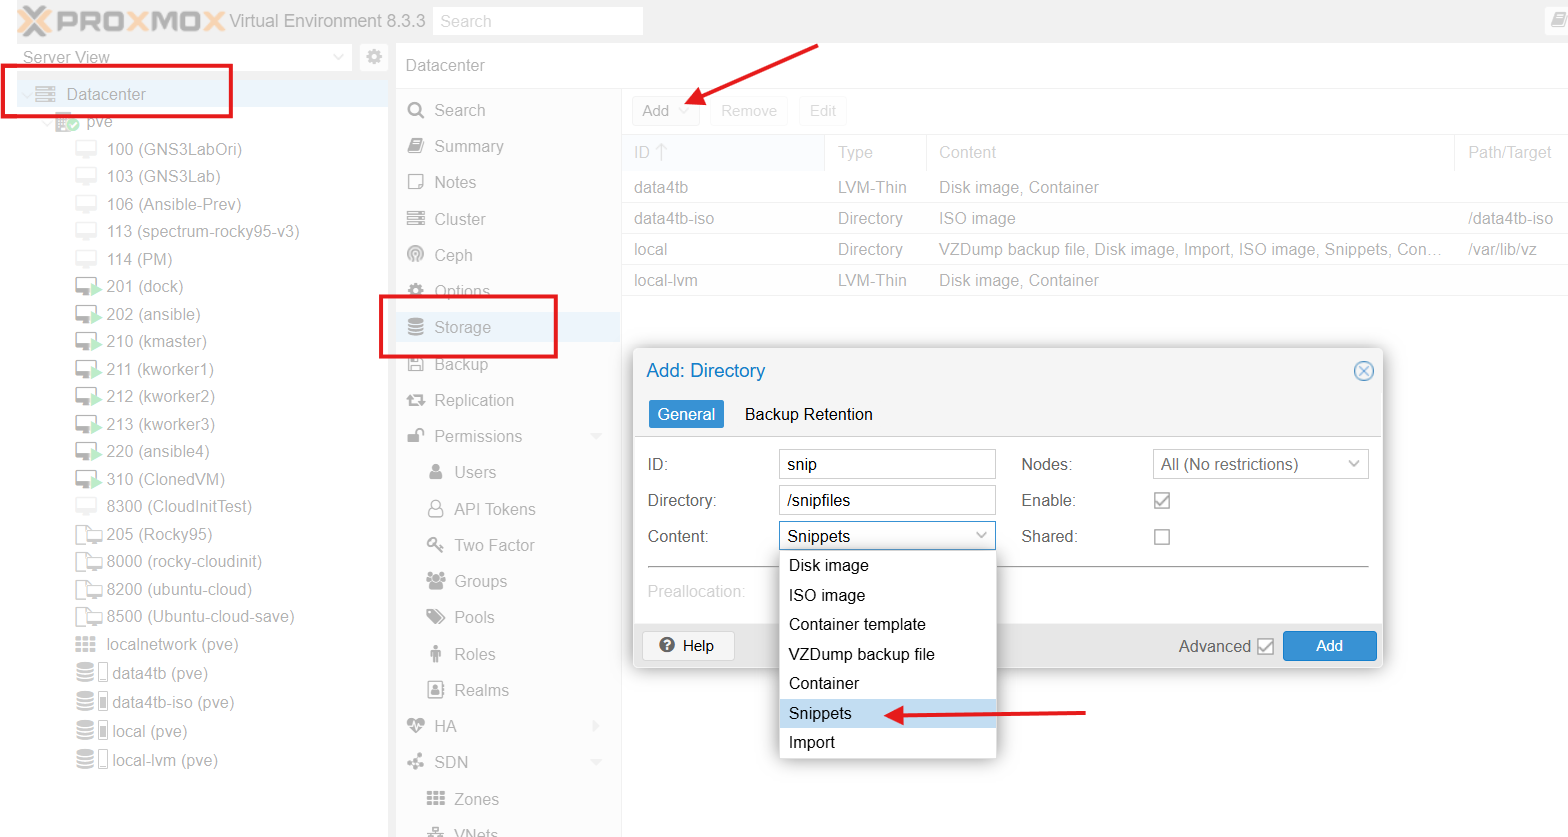
I created a storage called “snip” and gave it a the following location in the pve’s filesystem: /snipfiles. When the snippet location is created it creates a “snippets subfolder in “/snipfiles:
root@pve:/# tree snipfiles/
snipfiles/
└── snippets

2 directories, 0 files
Thus “/snipfiles/snippets” will be the folder in the pve’s filesystem where I will place snippets on my pve server.
Proxmox (or cloudinit) does not seem to like subdirectories in the snippets. You must create the configuration files in the snippets directory (i.e. /snipfiles/snippets).
Creating the configurations file “snippets”
While there are 4 different areas or sections in cloudinit (user, network and meta, vendor), I will only need to customise 2 of them: user and network.
You can then use the yaml files for user and network to configure these aspect of cloudinit.
Let’s create the two files. First the file for the user section which contains the hostname/FQDN, user, SSH keys and other parameters:
cat >> /snipfiles/snippets/user-data.yaml <<EOF
#cloud-config
hostname: ubuntu-cloud
manage_etc_hosts: true
fqdn: ubuntu-cloud.lab.davidmjudge.me.uk
user: ansibleuser
ssh_authorized_keys:
  - ssh-ed25519 AAAAC3NzaC1lZDI1NTE5AAAAIKL1EWv5ZwWTti7qoZbA+OZDGE5U+JhUU1Mxb+M0ZxkL ansibleuser@ansible4
  - ssh-ed25519 AAAAC3NzaC1lZDI1NTE5AAAAIAP9eyxA4P8mE51qmbnigiuEmX72dRFRuN4SLmp0ISuA david@Ryzen2
chpasswd:
  expire: False
users:
  - default
package_upgrade: true
# Following lines are useful if the options of the template have "QEMU Guest Agent" set to true.
# When it is true and the agent is installed and running, pve can "see inside" the VM
# and retrieve extra information such as the network configuration and display it in the GUI.
package_reboot_if_required: true
packages:
  - qemu-guest-agent
runcmd:
  - systemctl start qemu-guest-agent
  - systemctl enable qemu-guest-agent
  - echo "qemu-guest-agent enabled and started." >> ~root/cloutinit-finished.txt
EOF
The above configuration contains some extra entries to install the QEMU guest agent and to enable and start the service.
Then the file for the network section which contains the usual network configuration items:
cat >> /snipfiles/snippets/network-data.yaml <<EOF
version: 1
config:
    - type: physical
      name: eth0
      mac_address: 'bc:24:11:39:d8:2a'
      subnets:
      - type: static
        address: '192.168.178.210'
        netmask: '255.255.255.0'
        gateway: '192.168.178.1'
    - type: nameserver
      address:
      - '192.168.178.1'
      search:
      - 'lab.davidmjudge.me.uk'
EOF
Note that the MAC address will be replaced when the VM template is cloned, as MAC addresses need to be unique.
You can verify the full reference/path of the configuration files (what the pve documentation calls volume) you just created with the command pve list snip where “snip” is the name of the storage:
root@pve:/# pvesm list snip
Volid                           Format  Type      Size VMID
snip:snippets/network-data.yaml snippet snippets  340
snip:snippets/user-data.yaml    snippet snippets  639
The snippets must be in the root of your snippets volume - You cannot reference snippets in subdirectories.
The next command will configure cloudinit for our template with the 2 sections we created above. The command I will reference the snippets using the “snippets” storage reference snip: (as displayed by the pvesm list command).
qm set 8200 --cicustom "user=snip:snippets/user-data.yaml,network=snip:snippets/network-data.yaml"
The qm set –cicustom command changes, in effect, the whole of the cloudinit configuration. You can’t run it first for ‘user’ and then for ’network’ as running it for ’network’ will clear the ‘user’ configuration. The snippets are read/used when the VM is created.
You can also use this command on a cloudinit VM (as opposed to a template) - i.e. once you’ve cloned the template. The changes will take effect next time you start the VM.
While it is not possible today to view the cloudinit settings you have set in the GUI, you can check the VM/template’s config file. For the 8200 template, look at the content of /etc/pve/qemu-server/8200.conf. You will see the following line:
cicustom: user=snip:snippets/user-data.yaml,network=snip:snippets/network-data.yaml
To create the 4 VMs that started this article, I will eventually create 4 separate sets of config files and will prefix the filename with the hostname or id of the node - e.g. for the 3rd worker node, I would copy user-data.yaml to kworker_3_-user-data.yaml and then customise it.
Clone the template into a new VM
Here we clone the template to a new VM with ID 210 (which must be an available ID), making a full clone (independent from the template) and placing it in the ‘data4tb’ storage.
qm clone 8200 210 --full true --storage data4tb
All that’s left to do is start the VM
Parting thoughts
The process of creating the VMs for my k3s cluster can now start. My next step will be to write a script to take the “base” cloudinit data files and copy them to hostname-user-data.yaml and hostname-network-data.yaml and to customise them with data specific to the new vm such as hostname, fqdn and IP address.
I think I will probably write an article about that as I suspect not everyone knows the techniques that can be used to make this easy. Watch this space.
And if you’ve made it this far, many thanks for your perseverance. If you’ve found this useful, please let me know - either comment where you found the link (probably a LinkedIn post, or maybe my github), and maybe a like if you think the article is worthy of one.
Useful resources
Proxmox Cheatsheet by Software Engineering World
Top 10 Proxmox CLI commands - Naviko
CloudInit Reference with details of many modules one can use